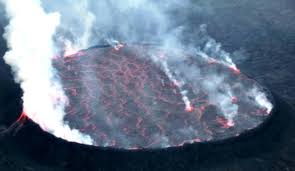
Capture Nature's Most Dramatic Spectacle
This specialized 3-day photography tour is designed for photographers of all levels who want to capture Nyiragongo's spectacular lava lake in optimal conditions. Unlike standard volcano hikes, this experience is timed and structured specifically for photography, with extended time at the crater rim, professional photography guidance, and attention to lighting conditions. Your photography guide will help you capture stunning images of the lava lake at different times - from the golden hour before sunset to the dramatic darkness of night when the lava glows most intensely, and through sunrise when the first light illuminates the volcanic landscape. This is a photographer's dream opportunity to capture one of Earth's most extraordinary natural phenomena.
Photography Tour Highlights:
- Extended Photography Time: Overnight + full day at crater rim
- Professional Photography Guide: Expert in volcano photography techniques
- Optimal Shooting Times: Golden hour, blue hour, night, sunrise sessions
- Equipment Porter: Dedicated porter for photography gear
- Workshop Sessions: Technical instruction at volcano summit
- Individual Coaching: One-on-one photography guidance
- Post-Processing Session: Basic editing workshop after descent
- Photography Certificate: Special photography achievement certificate
- Small Group: Maximum 6 photographers for personalized attention
- Gear Recommendations: Pre-trip equipment advice and checklist
Detailed Photography Itinerary
DAY 1: ARRIVAL & PHOTOGRAPHY PREPARATION
Arrival in Goma: Collection from airport or border with assistance for gear.
Meet Photography Guide: Introduction to your professional photography guide.
Gear Inspection: Camera equipment check and recommendations.
Photography Briefing: Comprehensive briefing on volcano photography:
- Camera settings for lava photography
- Night photography techniques
- Long exposure considerations
- Safety for camera equipment in volcanic environment
- Composition ideas for volcanic landscapes
Equipment Preparation: Assistance with packing camera gear for trek.
Meet Porter Team: Introduction to dedicated photography gear porters.
Technical Workshop: Hands-on practice with recommended settings.
Lunch & Discussion: Group lunch with photography planning discussion.
Afternoon Rest: Time to rest before evening departure to volcano.
Final Preparations: Last-minute equipment checks and battery charging.
Early Dinner: Energy-packed dinner before volcano trek.
Transfer to Trailhead: Drive to Kibati starting point.
Begin Trekking: Start ascent in late afternoon for optimal arrival timing.
Sunset Trek: Hike during beautiful evening light for landscape shots.
Arrival at Crater: Reach summit just before sunset for golden hour photography.
First Lava Shots: Initial photography session during golden hour.
Dinner & Rest: Quick dinner then prepare for night photography.
DAY 2: FULL DAY PHOTOGRAPHY AT CRATER
Night Photography Session: 2-3 hours of dedicated night photography (10 PM - 1 AM):
- Long exposure techniques for lava flows
- Star photography with lava foreground
- Multiple exposure blending techniques
- Light painting experiments (if conditions allow)
- Time-lapse setup for changing lava patterns
Short Rest: 3-4 hours of rest in cabins (optional - some photographers continue shooting).
Pre-dawn Session: Wake before dawn for morning light transitions.
Sunrise Photography: Capture sunrise illuminating lava and crater (5:30-7:30 AM):
- Dramatic silhouette shots
- First light on lava patterns
- Morning color transitions
- Atmospheric conditions photography
Breakfast & Review: Breakfast while reviewing morning shots with guide.
Daylight Photography (8 AM - 4 PM): Full day of photography in changing light:
- Morning Light (8-11 AM): Clear, harsh light for detail shots
- Midday (11-2 PM): Overhead light for contrast studies
- Afternoon Light (2-5 PM): Softening light for atmospheric shots
- Workshop Sessions: Technical instruction between shooting
- Individual Coaching: One-on-one guidance from photography guide
Lunch & Technical Discussion: Working lunch with photography theory discussion.
Golden Hour Preparation: Set up for second golden hour session.
Evening Golden Hour (5-7 PM): Second golden hour photography session.
Dinner & Image Review: Dinner followed by group image review session.
Second Night Session (Optional): Additional night photography for those with energy.
Rest Period: Final rest before morning descent.
DAY 3: FINAL SESSION & POST-PROCESSING
Final Sunrise Session: Last opportunity for sunrise photography.
Morning Light Shots: Final photography in morning light conditions.
Breakfast & Pack-up: Final meal at summit while packing camera gear.
Last Shots: Final photography opportunities before descent.
Begin Descent: Start careful descent with camera equipment.
Forest Photography: Optional photography in forest during descent.
Arrive at Base: Complete trek at Kibati starting point.
Certificate Presentation: Receive volcano photography certificate.
Transfer to Goma: Return to hotel in Goma for showers and rest.
Lunch & Casual Review: Relaxed lunch with initial photo sharing.
Post-Processing Workshop (2-3 hours):
- Basic editing techniques for volcano photos
- Night photography processing workflow
- HDR and exposure blending demonstrations
- Color correction for volcanic scenes
- Sharpening and noise reduction techniques
Individual Feedback: One-on-one feedback on best images.
Group Critique: Constructive group critique session.
Farewell Dinner: Celebration dinner with fellow photographers.
Image Backup Assistance: Help with backing up images before departure.
Departure: Transfer to airport or border for onward journey.
Follow-up Support: 30 days of online support for image processing.
Photography Focus Areas & Techniques
Learn specialized techniques for capturing the lava lake at night including: long exposures (30 seconds to several minutes), star photography with lava foreground, light painting techniques, and multiple exposure blending. You'll work with your guide to master camera settings for low-light conditions, focus techniques in darkness, and composition strategies for dramatic night scenes. Special attention will be given to protecting camera sensors from heat and managing equipment in cold, damp conditions.
Capture the dynamic movement and textures of molten lava with techniques including: fast shutter speeds to freeze motion, slower shutter speeds to show flow patterns, bracketing for high dynamic range scenes, and macro techniques for detailed lava texture shots. You'll learn to read the lava lake's activity patterns to anticipate photographic opportunities and work with the constantly changing light conditions created by the lava's own glow.
Develop your eye for volcanic landscapes with guidance on: foreground elements to create depth, leading lines using volcanic features, balancing the dramatic lava with surrounding crater elements, and working with the unique color palette of volcanic environments (black rock, red lava, blue gases, green vegetation at lower altitudes). You'll explore both wide-angle vistas and intimate detail shots of volcanic features.
Learn to protect and manage your photography equipment in challenging volcanic conditions including: protecting cameras from volcanic dust and gases, managing condensation when moving between temperature extremes, battery management in cold conditions, and safe practices for tripod use on uneven volcanic rock. Your dedicated gear porter will assist with equipment transport, allowing you to focus on photography.
Photography Equipment & Logistics
DSLR or mirrorless with manual controls
Wide-angle (16-35mm), standard zoom, telephoto
Sturdy tripod for night/long exposures
Extra batteries, chargers, power banks
Multiple memory cards, portable storage
Protective backpack for mountain transport
Filters, remote shutter, lens cleaning kit
For post-processing workshop
What's Included in Photography Tour:
- Photography Guide: Professional photographer with volcano experience
- Gear Porter: Dedicated porter for photography equipment
- Extended Summit Time: Overnight + full day at crater rim
- Photography Workshops: Technical instruction sessions at summit
- Post-Processing Session: Editing workshop after descent
- Volcano Permit: Nyiragongo hiking permit with extended access
- Accommodation: 2 nights (summit cabin + Goma hotel)
- All Meals: From dinner Day 1 to dinner Day 3
- Transport: All ground transportation as per itinerary
- Certificate: Volcano photography achievement certificate
- Online Support: 30 days of follow-up photography support
This tour is suitable for photographers of all skill levels - from enthusiastic beginners to experienced professionals. The photography instruction is tailored to individual needs. Physically, this tour is demanding due to: 1) The challenging hike to 3,470m carrying/wearing camera gear, 2) Extended hours of photography (including night sessions), 3) Cold conditions at altitude requiring physical stamina. Participants should be in reasonable physical condition and prepared for the demands of high-altitude photography. The dedicated gear porter significantly reduces the physical burden of camera equipment.
Essential Photography & Preparation Tips
Test Everything: Test all equipment before trip, especially in low light. Battery Management: Cold drains batteries - bring 3x your normal supply. Lens Selection: Prioritize wide-angle for landscapes, bring fast prime for night. Protection: Weather-sealed equipment recommended, bring protective bags.
Pace Yourself: Photography marathon - conserve energy for key sessions. Gear Safety: Never leave equipment unattended near crater edge. Condition Management: Protect equipment from volcanic dust and temperature changes. Backup Frequently: Backup images multiple times during extended stay.
Bracket Exposures: The dynamic range exceeds camera capabilities. Manual Focus: Autofocus struggles in low light - practice manual techniques. Composition Variety: Shoot wide landscapes, medium details, and tight abstracts. Time-lapse Consideration: Setup time-lapse for changing lava patterns.
Eye Protection: Lava is bright - consider neutral density filters for viewing. Hand Warmers: Essential for operating cameras in cold night conditions. Hydration & Nutrition: Maintain energy through long photography sessions. Rest Strategy: Schedule rest periods between photography sessions.
Best Time for Volcano Photography:
- Dry Seasons (Best): June-September & December-February
- Clear Skies: December-February often has clearest skies for stars
- Lunar Cycle: New moon periods for darkest skies and star photography
- Weather Windows: Longer dry periods allow for better planning
- Lava Activity: Check current volcanic activity levels when booking
- Group Size: Limited to 6 photographers for optimal shooting conditions
Portfolio Development: Opportunity to create stunning volcano photography portfolio. Skill Advancement: Significant improvement in night and landscape photography skills. Technical Mastery: Master challenging photography conditions. Ongoing Support: 30 days of online support for image processing questions. Community Connection: Connect with other serious photographers.
Ready to Capture This Natural Wonder?
Join our specialized photography tour to capture Nyiragongo's lava lake in optimal conditions with expert guidance. Limited to 6 photographers per tour.
Book This Photography TourContact our photography specialists for equipment advice and optimal timing for your photography goals.